
For the next set of black stitches, move your needle slightly outwards from the yellow stitches to accomodate for more stitches. This will create some dimension to the body and make the bee look more "pudgy". Now you will create eight (8) cast on stitches with your black needle and eight stitches with the yellow needle that will follow. Thennnnn....you will be back to the black thread! Reduce the number of cast on stitches to five (5) and again, park the needle. Yellow is the final row of cast on stitches and will consist of three (3) stitches. When you take the thread to the back of the fabric, knot it and cut it off. You're done with the body! Next, we will make the head with a french knot. If you prefer to use a colonial knot, go for it! I like the french knots (which for some reason I keep calling them pearl knots giggles...), as I can increase or decrease the number of wraps on the needle as I want and affect the size of the knot accordingly. In this example, I wrapped the needle five (5) times then took the thread to the back of the fabric again.
Now, for the antennae, bring your needle and thread to the top of the fabric approximately a quarter of an inch and to the right of the head, pulling the thread completely through the fabric. Move directly to the left, about a quarter of inch ( I eye this to make it look more realistic. All the "measurements" I am giving you are just approximations) and take the needle to the back of the fabric, then back up in the middle, right beside the pearl knot. Take this slowly, making sure that you catch the loop of thread. You will then tack the thread down by pulling the needle over the loop and back to the back of the fabric. Repeat these fly stitches four more times for the legs as shown here.
Thursday, January 04, 2007


Honey Bee tutorial cont.
Repeat the process and create two more stitches. You will then want to take hold of the the needle AND the stitches and pull the needle through the fabric and cast on's, closing the circle. This will create a little ridged loop over the fabric. Your thread will now be on the right hand side. You need to push the needle through the fabric at the base where the thread was originally brought up and draw the thread completely to the back. We will now need to switch to the yellow thread, so just "park" the needle and black thread to the side for a moment. Repeat this process with the yellow thread, only increase the number of cast on stitches by one stitch. Draw the needle and thread through to the back of the fabric, just as you did with the black thread and temporarily park this needle and switch back to your black thread.

Honey Bee tutorial cont.
Once you have place the loop on the needle you will pull the excess thread towards you, tightening the loop and draw it towards the opening where the needle came back out of the fabric. It should look similar to this photo when done. (For those of you that are left handed, reverse the direction of the needle and use your right hand to loop the thread over the needle.)

Honey Bee tutorial cont.

The cast on stitch is done the same way that you would cast yarn onto a knitting needle. Basically it is a slip knot....for lack of a better term. Once you have placed your needle thru the fabric (taken a bite out of the fabric) you will start "casting on" stitches. Pick up your thread with your left hand, creating a semi circle that will allow you to loop the thread over the needle. Twist your hand in-ward, counter clockwise to close the circle and drop the loop over the needle. The first batch will be only three stitches. For more visual references, check out Sharon B's Stitch Dictionary..... http://inaminuteago.com/stitchdict/stitch/caston.html
Honey bee tutorial cont.
you will want to bring your thread to the top of the fabric about three quarters of the way up the stinger. Take a "bite" of the fabric, from right to left, bringing the tip of the needle out next to the thread. DO NOT PULL THE NEEDLE THROUGH!!!! Here we will start making cast on stitches that create the body of the bee.

Honey Bee Tutorial Cont.
To begin you will want to make a small straight stitch, approximately a quarter of an inch long. This represents the stinger so you will need to decide which direction you want your hummer to fly. The stitch itself will be partially covered with the body of the bee! Once you have made this stitch.....

Honey bee tutorial
to
I belong to the Hand-Embroidery group over at yahoo. They are a super group of folks and the owner Lillian and moderator, Melissa are just great! Long story short, Melissa has a blog, http://www.honeybeesbliss.blogspot.com, titled such for the meaning of her first name! At any rate, she saw the dimensional embroidered bee here that I had stitched on a pin cushion and wanted to know how to make it. Hmmmm.... wonder why? LOL!!! Soooo....i'm going to attempt to do a little tutorial here. If anyone has a question about any of the steps, please let me know and I will do my very best to help out! Also, if you are not familiar with the cast on, bullion or fly stitches, I would recommend that you practice on a "doodle cloth" before you jump into creating the bee on a block. The stitches are easy once you are familiar with them, but can be a little frustrating at first. DON'T let it stop you! Like anything in embroidery, practice and just relaxing to enjoy the process are all you need to start creating dimensional embroidery!
To start out, you want thread two millners needles. I used size 11. One with black, the other with yellow. It's important to use millners needles as the cast on stitches and bullion stitches as the eye of the needle is the same dimension as the needle itself and will allow the stitches to slide easily off the needle. I prefer to use Edmar rayon thread, but don't always have it on hand, so will also use DMC embroidery thread (as shown here.) I vary the number of strands that I use as sometimes I want a bee that is larger (or smaller) than the example that I am going to show you. For this particular BEE I used two (2) strands of DMC thread. The bee will be approximately 1/2" when complete. We will be using the fly, cast-on and bullion stitch to create this little "Hummer"!!
HBVariation5
Another addition to my Take A Stitch Tuesday! (www.inaminuteago.com).
This bit I did before I accidentally "found" the fish! :_) I was experimenting with changing the sizes of the stitches withing the row as well as their location. I like this idea from the perspective of creating the image of a fence on a block. It has potential if lazy daisy stitches or fly stitches are added to it as well. I'll have to continue to play with this one!
HBVariation4
This time I played with increasing and decreasing the size of the herringbone within the row. I was pleasantly surprised when I created a fish!! This will be GREAT for a project I have to do for a grandson! Woohoo!!! I think i'll try making the stitches a bit more dense then some of the fish can be more distant, some more up close! Even running another color under them...or weaving some organza type ribbon thru the stitches would be cool! Ohhhhh, the potential!

Take A Stitch, HB Variation
I played around a bit more last night and came up with some variations that are new for me. I thought i'd share them with you. This is a pic of them overall. Then i've got close ups i'll share of certain ones. Enjoy!

Tuesday, January 02, 2007
Melissa's DYB block
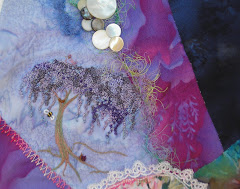
I'm trying to keep some stitching momentum going today. DH finally went back to work so I can focus on this! This block is from one of two DYB rr's I am in. I struggle with this for a bit....don't know why, but I got there and am fairly happy with it. Hopefully Melissa agrees! LOL!! You can see her work at www.honeybeesbliss.blogspot.com. I created a two tone rose on the bottom corner using bullions for the light pink and then added some cast on stitches in a deeper tone to accent it. The buds are made out of bullions. Just above is a herringbone variation. (I had already done this prior to Sharon B (http://inaminuteago.com/blog/index.php) announcing the stitch for TAST! SOOO, i'm pleased I have a couple of variations under my belt! There is another HB variation directly above the rose on the feather seam and again above the tree. Do you think maybe I like the herringbone? LOL!! Other variations I enjoy are a cross between the HB and the cretan or the chevron and cretan. I then typically get mired in finishing them off with lazy daisy stitches, fly stitches, etc. To break that habit I will experiment on my sampler and see what I find! I added a little bee charm, for Melissa, some beaded flowers and one of my trees! OH! I almost forgot, I also did a feather stitch variation, sweeping curves like a feather, floating above the tree in some kreinik (sp) metallic. Last but not least, I added a MOP button with some lazy daisy stitches and added a flower bead in the center to create a flower. Sooooo, thats it! I threatened Melissa I would do a tutorial on making a BE bee. Now i've got to get busy as a bee and start taking pics! 's

ArtBra Block
I am a part of a group of ladies that create Art Bra's and a special quilt for donation to various foundations for breast cancer. This is my raw block for the 2007 quilt. The theme is hearts and the primary color is to be purple. Well....that's a toughy for me, as I don't generally work in that color! I had to some digging to bet this one figured out! LOL!! But....this is what I created. I have my design ideas worked out on paper (also a rarity for me) and the thought behind this particular heart is that it was broken with disease and will be beautifully mended to create a new whole. I will add other heart motifs in the patches as well to show the strength of our spirits to overcome all obstacles! Enjoy! Stay tuned for further developments!

Herringbone variation
I decided to join in the fun and participate in Sharon B's TAST project! You can find more info on this at www.inaminuteago.com. I began "playing" right after I saw the posting last night. I was struck with the idea of creating a swirl with the herringbone stitch. Soo, I made these litle herringbone "commas" with some variegated dmc. I kinda like them! I think I will try to do some more, varying the sizes more dramatically starting with really small and going to super larger! The herringbone is one of my favorite stitches so this will be fun to play around with! I will continue to post work ideas as I get them stitched! Hmmmm......even layering these would be fun...or making them into swirled medallions or.....:_)

Saturday, December 30, 2006
Family Heirloom
This is a pic of a lap throw that was made for my son by his great grand mother. She did this for all the great grand kids one Christmas manyyyyyy moons ago. It was made with quite a variety of men's ties and some ummm....interesting polyester from blouses and dresses. (I presume anyway.) As can be seen there is a considerable amount of damage to it, inclusive of the feather stitch embroidery done on all of the seams.
I got a wild hair just after Thanksgiving and decided that it was time to get some projects (mmmmhmmmm) completed and dove head first into re-storing this quilt. There was more damage to it than met the eye. Like mildew damage to the foundation!!! Awckkkk!!! Sooo... I took some light weight flannel that I had and put it on the back. Keep in mind that i'm not a "planner" by nature and was flying by the seat of my pants on this one! I used the flannel as added support. Hind sight....should have traced the pattern of the original, taken apart the blocks and re-pieced it. Then...I could have made it straight, but then it wouldn't be an accurate reflection of the maker and the love she poured into this project. I then took out every piece of fabric that was damaged and re-placed it with pieces of ties that I have on hand. The embroidery overall was disintegrating, so I decided to take it out completely and re-do it pearl cotton in a similar color with hopes that it will hold up better under use. I wasn't worried about the monetary value of this piece, more about it's sentimental value to my son. I also wanted it to hold up for another 26 years without need of repair! LOL!!! It was with a HUGE feeling of relief and pride in the completion of this that after 80 hours, I can say I am done!!! I re-backed it, tied the edges, wrapped it up and fooled my son by saying it was from his great-grandma! :_) Oh! And the difference on this quilt....besides the fabric....and admittedly a bit of the stitching....I put a quilt label firmly on the back, documenting the date it was originally made, then re-stored and what was done! No one will ever wonder about this puppy again!! Now to get a pic of the "new" version so you can see the changes. I did quite a bit of reflecting while I worked on this and wonder how on earth a piece can be accurately restored with fabric from the period? The very thing that causes it to deteriorate would cause other "like" fabric to disintegrate too, wouldn't it? Hmmmm....something to explore! Enjoy!

I got a wild hair just after Thanksgiving and decided that it was time to get some projects (mmmmhmmmm) completed and dove head first into re-storing this quilt. There was more damage to it than met the eye. Like mildew damage to the foundation!!! Awckkkk!!! Sooo... I took some light weight flannel that I had and put it on the back. Keep in mind that i'm not a "planner" by nature and was flying by the seat of my pants on this one! I used the flannel as added support. Hind sight....should have traced the pattern of the original, taken apart the blocks and re-pieced it. Then...I could have made it straight, but then it wouldn't be an accurate reflection of the maker and the love she poured into this project. I then took out every piece of fabric that was damaged and re-placed it with pieces of ties that I have on hand. The embroidery overall was disintegrating, so I decided to take it out completely and re-do it pearl cotton in a similar color with hopes that it will hold up better under use. I wasn't worried about the monetary value of this piece, more about it's sentimental value to my son. I also wanted it to hold up for another 26 years without need of repair! LOL!!! It was with a HUGE feeling of relief and pride in the completion of this that after 80 hours, I can say I am done!!! I re-backed it, tied the edges, wrapped it up and fooled my son by saying it was from his great-grandma! :_) Oh! And the difference on this quilt....besides the fabric....and admittedly a bit of the stitching....I put a quilt label firmly on the back, documenting the date it was originally made, then re-stored and what was done! No one will ever wonder about this puppy again!! Now to get a pic of the "new" version so you can see the changes. I did quite a bit of reflecting while I worked on this and wonder how on earth a piece can be accurately restored with fabric from the period? The very thing that causes it to deteriorate would cause other "like" fabric to disintegrate too, wouldn't it? Hmmmm....something to explore! Enjoy!
Tuesday, December 12, 2006
CQ'd hearts
I belong to the Hand Embroidery yahoo group and there is a heart swap going on there right now. soooo, I thought i'd jump in and join the fun. I don't normally work in purples, but had it out as I was making a block for the Art Bra Ladies quilt. I then did some stich variations on the seams and utilized the butterfly lazy daisy that Sharon B of In a Minute Ago shared with us in her first class last spring. On the top heart, I had a MOP button that I thought would look good, but didn't have holes or a complete shank. It was a part of some vintage buttons I purchased awhile back. Anywhoo, I created a web over the button to hold it down and added some lazy daisies and french knots along with the litle butterfly. I tried to keep a more garden effect with doing a buttonhole stitch, adding fly stitches on top and the some french knots for flowers. It was stretch to work with these colors, but I like how they came out, especially the bottom heart! Can't wait to see what comes back my direction for the swap!

Tradewinds DYB 2
I don't post forever and here I am posting a ton of stuff all at once! Sighhh..... I wish I could learn to post more regularly. New Year's resolution, right? Welllllll????? LOL!!
This is a block I worked on for Hideko who keeps a blog... http://hideko-windfromtheeast.blogspot.com. This is a luscious block of silks, velvets and some metallic brocade fabric. I was stumped by what to do at first, but finally got in the swing of it. I decided to create a monogram in the lower left hand corner. A beaded rose is in the center, some feathers and some of my seam treatment variations. Gonna have to definately start challenging myself on my stitches! But then....that's what Sharon's "Take a Stitch" Tuesday will be all about, right? http://inaminuteago.com/blog/index.php?tag=take-a-stitch-tuesday I will be participating in this with some members in a small group I belong to. We thought it would be a great way to nudge each other along and develop or stitching repertoire! Should be fun! Now....just got to remember to post about it! Enjoy the pics!

This is a block I worked on for Hideko who keeps a blog... http://hideko-windfromtheeast.blogspot.com. This is a luscious block of silks, velvets and some metallic brocade fabric. I was stumped by what to do at first, but finally got in the swing of it. I decided to create a monogram in the lower left hand corner. A beaded rose is in the center, some feathers and some of my seam treatment variations. Gonna have to definately start challenging myself on my stitches! But then....that's what Sharon's "Take a Stitch" Tuesday will be all about, right? http://inaminuteago.com/blog/index.php?tag=take-a-stitch-tuesday
Windsong Jewels Block 1
I jumped into another DYB rr and this is the first block for this one! I decided to keep it light and more victorian to compliment the young girl. I, in fact, rather envisioned her looking out of a window so I gave her "lace curtains" done in the fly stitch. I outlined the pattern that was on the satin and gave it a small boost with some pearl beads and added the seam treatment variations that I seem to naturally drop into these days.... herringbone, lazy daisy and cretan. I really like the way they make things look victorian. Up top I added a feather with an outline stitch and feather stich then two fans on either side of the block. Soooo.....another block done! Yeahhhh!!!!

Sunday, November 05, 2006
Windsong Jewels DYB RR
I seem to be on a mission to avoid straight lines (basically) in my cq blocks these days! I don't know WHAT has gotten into me, but i've been playing around more with various shapes and patch sizes. It will be really interesting to see what everyone comes up with on these!!!! I'm not so sure what I would even do! Actually i'm hoping it will encourage my compatriote stitchers to explore outside the normal boundaries and carry stitching past the seams! We shall see what they come up with! It will great fun, I think!

Tradewinds DYB Block - Jo
I am involved in a couple of DYB rr's. I believe I have posted the pics I have sent out and this is the first block i've done for this rr. I played with stitch variations for the seam work, i'm finding I truly enjoy handwork and that it has a meditative effect on me. If I don't get a little time everyday to stitch i'm lost! :) The combo's you'll see here are the buttonhole stitch with a lazy daisy popped onto the top of every other stitch. The a little french knot in between for contrast. Above that is a wide herringbone stitch that has been done twice, with little fly stitch flowers on top. To the left is a cretan, chevron combo with a fly stitch and straight stitch on it. The there is the herringbone with a fly/lazy daisy combo above that and then to the right is the feather stitch with french knots and lazy daisies. I stamped the butterflies on the patch then embroidered them. All the other embroidery, I free handed the pattern first. I did a feather to represent flight, a "dove" created with a padded beaded body and french knot wings. The pansies are just a rather favorite flower for me and touch of me to to the block. I added a beaded wind goddess to finish the block off along with some crystal beads on the feather. The little button is from my grandmothers button box soooo.....it's a nice vintage touch to the block, I thought!

Wednesday, November 01, 2006
Art Meme
">Link
I've decided to take up the challenge of the ART MEME. I responded to Elizabeth's offer( http://www.veridianeyes.blogspot.com/ and need to post here. So the first five people to respond to the challenge via comments on this blog will get a small piece of art created by me. It will be something drawn, sewn, beaded or embroidered, maybe molded. I'm not quite sure what, but you will get something that I have made with love in order to 'spread the love'. The catch with this is that you also have to make the same sort of offer on your own blog. That means, this is not an exchange, you do not have to send me anything in return, but you must try to "pay it forward" though your own blog. So get commenting, and once I see you've taken it up, posted it and got people taking part then I will start making things.I can't promise how soon you'll get them, but you will get them. If you could post your snail mail addie to me privately, i'll be set! :_)
Subscribe to:
Posts (Atom)



 Posts
Posts


