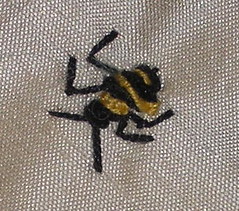
For the next set of black stitches, move your needle slightly outwards from the yellow stitches to accomodate for more stitches. This will create some dimension to the body and make the bee look more "pudgy". Now you will create eight (8) cast on stitches with your black needle and eight stitches with the yellow needle that will follow. Thennnnn....you will be back to the black thread! Reduce the number of cast on stitches to five (5) and again, park the needle. Yellow is the final row of cast on stitches and will consist of three (3) stitches. When you take the thread to the back of the fabric, knot it and cut it off. You're done with the body! Next, we will make the head with a french knot. If you prefer to use a colonial knot, go for it! I like the french knots (which for some reason I keep calling them pearl knots giggles...), as I can increase or decrease the number of wraps on the needle as I want and affect the size of the knot accordingly. In this example, I wrapped the needle five (5) times then took the thread to the back of the fabric again.
Now, for the antennae, bring your needle and thread to the top of the fabric approximately a quarter of an inch and to the right of the head, pulling the thread completely through the fabric. Move directly to the left, about a quarter of inch ( I eye this to make it look more realistic. All the "measurements" I am giving you are just approximations) and take the needle to the back of the fabric, then back up in the middle, right beside the pearl knot. Take this slowly, making sure that you catch the loop of thread. You will then tack the thread down by pulling the needle over the loop and back to the back of the fabric. Repeat these fly stitches four more times for the legs as shown here.
Thursday, January 04, 2007
Subscribe to:
Post Comments (Atom)


2 comments:
Is a pearl knot the same as a french knot?
Just wondering!
LOL That's funny! I thought it sounded just like a french knot! But there are so many types of knots, I had to ask!
Post a Comment