
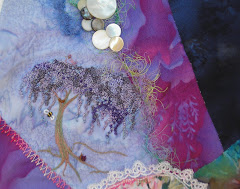
I have a cyber beading bud that shared some directions from a class she had taken. The sample she sent me was for a bracelet, but I took one look at it and knew it would be a neat seam treatment or addition to the art dolls I was doing! SOOO, I jumped in and gave it try! It worked! As can be seen on my "Forest Within" piece. I also decided to put it on a doll I was making for a swap with Judy at Christmas! She fell in love with it and after trying to explain it thru email, I called and talked her thru it! She is now attaching it to everything!! LOL!! She also requested that I do a small tutorial on it, sooo, at l ong last, i'm getting it done!
 ong last, i'm getting it done!
The first thing you want to do is lay down a line of stitches on the doll or cabachon or seam. I typically thread 4 beads, go thru the fabric, wrap back up thru the last two beads then proceed in this way, adding 3, back 2, add 3, etc. until I have a line the length that I want. Then you will need to come back up (after securing the last bead underneath) directly next to the bead.

Thread 3 beads onto your thread/needle, skip over the first bead and go thru the second bead. You will then thread 3 more beads, skip over a bead then go thru the 4th bead. Progress in this way, adding 3 beads, skipping one, thru a bead until you have reached the end of the line of beads you laid down. Go under the fabric, secure your stitch and come back up directly next to the last bead. This time you will thread on 5 beads and the go to the middle bead of the 3 (at the top of the hill basically). Then, thread 5 more beads, thru the middle bead on the second batch of 3 beads and so on until you reach the end. At this point you will see a distinct ruffle forming. This stitch can be done with up to 7 beads per "hill", but I tend to stop at 5 as it gives enough fringe for most of my projects!  In this last picture you can tell fairly clearly the difference between three and five beads. The face has been wrapped with five and the body is going to be left at three.
 In this last picture you can tell fairly clearly the difference between three and five beads. The face has been wrapped with five and the body is going to be left at three.
 I hope you enjoy this stitch! I surely do! If you need any help or further directions, please let me know and I will do my best to help you!


2 comments:
That looks so interesting! I've seen it on the faces being made into broaches, but this is an even better application.
Hello Leslie, Yipppppppeeeeeeeeeeeee My friend, thanks for telling the world how wonderful this beading stitch is. I am still Crazy over it. Hugs Judy
Post a Comment